

4Orders
From the moment a customer checks out until the parcel arrives: confirming payments, shipping, invoices, changes, refunds and returns.
The order list #
Sales → Orders shows your orders, newest first. The tabs along the top sort them by what needs doing:
- Needs action: everything waiting for you.
- To fulfil: paid orders to pack and send.
- Awaiting EFT and Awaiting online payment: orders waiting for payment.
- Fulfilled, Completed, and Cancelled / refunded.
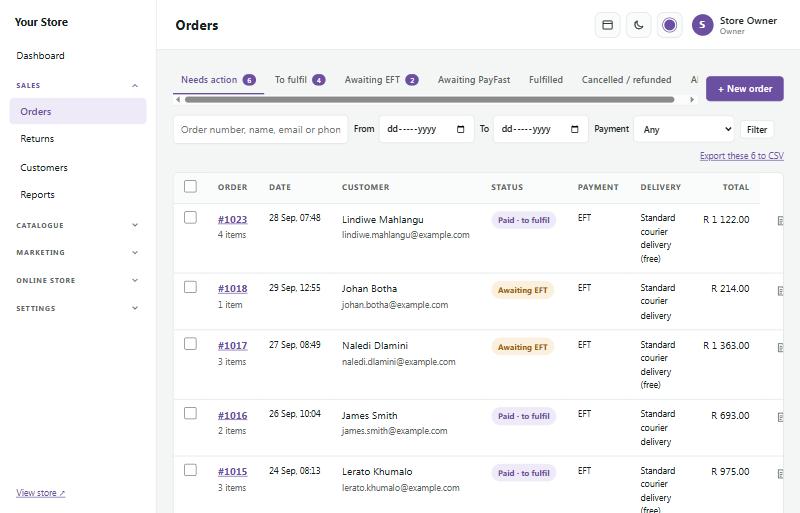
Search by order number, name, email or phone, filter by date or payment method, and use Export these … to CSV for a spreadsheet. Tick several orders to print packing slips, or to mark them fulfilled or completed together (tick or untick Email customers). Before anything changes you see a summary: how many orders will change and how many customers would be emailed. Orders older than 30 days are flagged and their emails are left off, so old orders can be tidied up without emailing customers.
Who's online #
Sales → Who's online shows the shoppers on your store right now, updating by itself every few seconds. Each shopper gets a card showing what they're doing (looking at a product, in the cart, at checkout), the page they're on, the last few pages they saw, their phone or computer, where they came from (Google, Facebook, a link and so on) and what's in their cart. At the top are the totals: shoppers online, looking at products, with items in their carts, at checkout, and the value of all open carts. For shoppers who left their email and didn't finish, see "Where to find your abandoned carts" under Follow-up emails in the chapter "Marketing". On the side, a chart shows the last 30 minutes, and a stream lists what's happening: arrivals, searches, items added to carts and orders placed.
Press Sound off to switch on a chime for new orders and items added to carts (a brighter one for orders). Leave the page open in a tab while you work.
Visits are anonymous unless a customer is signed in, no IP addresses are kept, and everything is cleared after two days. Search-engine robots and signed-in staff are left out. You can switch it off at the bottom of the page.
Phone app #
Open Phone app (at the bottom of the admin menu) to put your admin on your phone's home screen like an app. There is nothing to download from an app store and no cost.
- iPhone or iPad: open your admin in Safari, tap Share, then Add to Home Screen. Open the new icon, go to Phone app and switch on notifications.
- Android: in Chrome, tap Install the app (or the menu ⋮, then Install app). Computers with Chrome or Edge can install it too.
Press Switch on notifications to hear about new orders, quote requests and return requests the moment they happen, with your phone's notification sound, even when the app is closed. Tap a notification to open that order. Choose which ones you want, and use Send a test to check. Switch it on separately on each phone or computer; each staff member only gets the notifications their role allows. Notifications only say what happened: the details come straight from your store when you open them.
How an order moves along #
- Placed: the customer checks out. They get an order confirmation email.
- Paid: online payments (PayFast, Yoco, Ozow, Peach Payments and PayPal) are confirmed automatically. EFT payments are confirmed by you (see below).
- Fulfilled / shipped: you send the parcel and mark it shipped. The customer gets their tracking details.
- Delivered: courier deliveries are tracked by themselves.
- Completed: the order is done, delivered or collected, with nothing more to do. You mark it completed. An order the customer collects, a digital order or a sale in person can go straight from Paid to Completed.
Click an order number to open it. The coloured box at the top always shows the next step for that order.
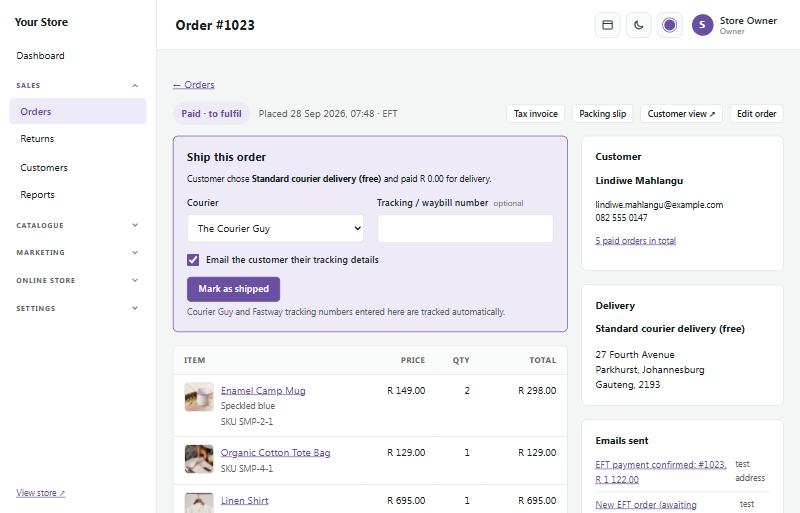
On the right you'll find the customer, the delivery address, the emails the customer was sent, and the Timeline of everything that happened to the order. Use Add note for notes only staff can see.
The order shows the billing address, which is the customer's main address, and the delivery address (or says they're the same). It also shows on the customer's order page. A collection order has no delivery address: the customer's address is kept as its billing address. The tax invoice always shows the main address under Bill to. When the order goes to another delivery address (or a locker), the invoice notes it under Delivery as Deliver to:. The packing slip shows the delivery address, or Collection.
Confirming EFT payments #
When a customer pays by EFT, the order waits under Awaiting EFT with the box Confirm the EFT payment.
- Check your bank account for the payment (the customer uses the order number as reference). If the customer uploaded proof of payment, it's shown on the order.
- Press Mark as paid.
- The customer gets a payment confirmation email and the order moves to To fulfil.
Deliveries by day #
Sales → Deliveries by day (shown once you've set up delivery time slots)
The orders booked for one day, grouped by delivery method and time slot, with how full each slot is ("2 of 3 booked"). The row at the top shows the next 14 days and how many orders each has. Choose a day, a method, or tick Include cancelled, then press Print day sheet for your driver or packing table: each order has a tick box, the address, phone number and the customer's note.
The chosen day and time also shows on the order page, in the order list (with a Delivery day filter), on the invoice, the packing slip, the customer's order page and their emails.
To change an order's time, open the order and use Change the time in the Delivery box. Tick Book it even if it's full to add an extra order to a full slot, and Email the customer the new time to tell them. The delivery fee on the order isn't changed: use Edit order for that.
Shipping an order #
When an order is paid, the box at the top changes to Ship this order:
- Choose the Courier and type the Tracking / waybill number.
- Leave Email the customer their tracking details ticked.
- Press Mark as shipped.
If you connected a courier account, Book courier books the collection for you and fills in the waybill. For orders the customer collects, the box says Ready for collection instead.
Separate deliveries. When the order has items that ship on their own (see Big items, specialised couriers, handling and insurance in Store setup), the box lists each delivery: what is in it, the courier and price the customer chose, any handling and insurance, and the box size. Send each one with Mark delivery 1 as sent and its waybill number: the customer is emailed that part of the order is on its way. When the last one is sent, the order is marked shipped and the customer gets the usual email. Sent everything together after all? Use Mark the whole order as shipped. Booking these deliveries through a connected courier account isn't possible yet: book them with the courier and type the waybill.
Changing an order's status #
The Status box at the top right of an order changes its status in one step:
- Under Change status to, choose the new status. You only see the ones that make sense for this order: Paid (an EFT that reached your bank: type the amount), Fulfilled (courier and tracking number are optional), Completed or Cancelled (for unpaid orders: the stock goes back on sale).
- Type a Note for the customer if you like. It shows on their order page and in the email.
- Leave Email the customer about this change ticked to email them, or untick it to update the order quietly.
- Press Update status.
Every change is written in the order's Timeline, with "customer emailed" or "customer not emailed". Refunds aren't in this list: use the Refunds box (a completed order can still be refunded or returned). Stock doesn't change when an order is completed, because it was taken when the order was placed. You can change the wording of the "Order completed" email, or switch it off, under Settings → Emails.
Invoices and packing slips #
At the top of every order:
- Tax invoice: a printable invoice with your business details and VAT.
- Packing slip: a list of items to pack, without prices.
- Customer view: the order page exactly as the customer sees it.
Print or save them as PDF from your browser's print window.
The customer's note from checkout (delivery instructions, a gate code or a gift message) shows in a box of its own on both documents, with its line breaks kept: Customer note on the tax invoice and Delivery instructions on the packing slip, so the packer and the driver can't miss it.
Creating an order for a customer #
Took an order by phone or WhatsApp? Create it yourself:
- Go to Sales → Orders and press + New order (or press Create an order for them on a customer's page).
- Choose or add the customer, then add the products.
- Choose delivery and how they'll pay. The customer can be emailed a link to pay online, or pay by EFT.
Point of sale #
Selling at a market, a pop-up or your own counter? Sales → Point of sale turns your phone or tablet into a till. Sales come off the same stock as your online store and show up in your orders and reports.
1. Tap a product to add it (choose the size or colour if it has options), or search by name, SKU or barcode. Press the barcode button to scan with the camera (on phones and browsers that can read barcodes), or type the code and press Enter. A plug-in barcode scanner works too.
2. Use − and + to change quantities. Staff who may give discounts can tap a price to change it or take a % off, and type a Discount on the sale (an amount like 50, or 10%).
3. Add a Customer if they want their receipt by email or loyalty points. Leave it empty for a walk-in sale.
4. Press Take payment and choose how they paid:
- Cash: type the cash given (or tap a quick amount) and the change is worked out for you.
- Card machine (Yoco, SnapScan, Speedpoint and so on): take the payment on your machine first, then tick that it was approved. Add the slip's reference if you like.
- EFT / instant payment: tick once you've seen the money come in, and add its reference.
5. Press Complete sale. The order is saved as paid and handed over, and the stock is taken off.
On the receipt screen you can Print receipt, Send by WhatsApp (a short receipt with a link to their order page) or start a New sale. Customers are only emailed if you tick Email the receipt.
Selling offline (load-shedding)
The till keeps selling when the power or the internet goes down, and catches up by itself when it's back.
- Open Sales → Point of sale once while you're online, signed in as the staff member who will sell. The till saves a copy of your products, prices, barcodes, stock, VAT and receipt details on the device, and refreshes it every few minutes while it's in use.
- When the connection drops (or the store doesn't answer within a few seconds), a red bar says Offline – 3 sales waiting to sync. Keep selling as usual: search and scan work from the saved copy. Take Cash, or Card (recorded manually) if your card machine works on its own (its own SIM or Wi-Fi). EFT, customer search and emailed receipts need a connection.
- Each sale is saved on the device with its own number and prints its own receipt (Print receipt). It stays safe if the browser closes or the power cuts out.
- When you're back online the sales upload by themselves, oldest first, and become ordinary orders with the time they were sold. Nothing is ever saved twice, even if it is sent again.
Unsynced sales lists what is waiting on the device. If a device has to be reset, or sales won't upload, press Export CSV or Export JSON first and ring them up by hand.
A sale that already happened is never refused. If the same item also sold online meanwhile, the stock may go below zero; if a price changed, the order keeps the till's price. Both show under Sync log → To check (and on the phone app as a "New orders" alert), where you press Mark as checked once you've sorted them out.
Quotes #
For customers who want a price first: trade buyers, big orders and special requests. Find them under Sales → Quotes.
Quote requests from the store
- Tick Shoppers can ask for a quote from their cart on the Quotes page. The cart then shows Request a quote instead.
- The shopper adds their details and a note. Their cart's items become a quote request, you get an email, and it appears under New requests.
Preparing and sending a quote
- Open the quote (or press New quote to start one for a phone or email enquiry).
- Add or remove products, change quantities and type your quoted price for any item; leave it empty to quote the normal price.
- Choose the delivery (your standard rate, free, a cost for this quote, or collection), add a discount if you like, a valid until date and a message.
- Handling and Insurance in transit are added to the delivery (not when the customer collects) and shown as their own lines on the quote, the order and the invoice.
- Delivery quotes come from items marked Delivery quoted by us: the request has the customer's delivery address and the item's handling and insurance. Fill in the Delivery cost before sending (it can't be sent without one).
- Save and send to the customer emails them the quote with a button to view it. Save without sending keeps it as a draft. The Quote link can also be shared on WhatsApp.
When the customer accepts
The customer opens their quote link, chooses to pay online or by EFT, and presses Accept and place my order. It becomes a normal order at the quoted prices (stock is taken then), marked with the quote number. A quote past its valid until date can't be accepted; the customer is asked to contact you. They can also decline it, and you can cancel a quote at any time before it's accepted.
Subscribe & save (repeat orders) #
For things people buy again and again, like coffee, pet food or skincare. Shoppers choose to have a product delivered every few weeks and pay a little less each time.
Switching it on
- Go to Online store → Store features and tick Subscribe & save (repeat orders). Set the standard discount (10% to start), the intervals new products offer (every 2, 4, 6 or 8 weeks) and how many days to pay a repeat order.
- Open each product that suits it and, under Subscribe & save, tick Offer Subscribe & save on this product. Change the discount and the intervals for that product if you like. Bundles can't be subscribed to.
What the shopper sees
- On the product page they choose One-time purchase or Subscribe & save, with both prices shown, and pick Deliver every 2, 4, 6 or 8 weeks.
- The cart and checkout show the line as a subscription. The discount comes off the price they would pay anyway: a sale price, their trade or tier price and any bulk discount.
- The first order is placed and paid like any other order.
Repeat orders
- When the first order is placed, the store saves a subscription for each interval chosen. Items with the same interval arrive together, with one delivery charge.
- 3 days before each date the customer gets a reminder email, so they can skip or change it.
- On the date, the store makes the next order by itself (Awaiting payment) at today's prices less the discount, to the same address. Delivery is your standard rate (collection stays free, and a locker or pickup point keeps its price). Items no longer for sale, or sold out, are left out and the email says so.
- The customer gets an email with a button to pay. No card details are kept: the customer pays each order themselves, the way they paid before (card or instant EFT online, or EFT). An unpaid order is cancelled after the days to pay, like any order. After two unpaid orders in a row the subscription pauses itself, and if the very first order is never paid, it is cancelled.
- Repeat orders are marked with the subscription number. If you use live courier quotes, book the courier from the order page as usual.
Managing subscriptions
- Customers manage theirs from the link in every subscription email, without signing in: skip the next order, change how often, pause, resume, remove an item or cancel. Signed-in customers also see them on their account page.
- Sales → Subscriptions lists them all with the next order date and what each is worth a month. You can skip the next order, pause, resume or cancel one for a customer who asks.
- Switching Subscribe & save off stops all repeat orders and reminders; customers can still see and cancel theirs.
- Change the wording of the two emails (Subscribe & save: next order coming up and Subscribe & save: order ready to pay) under Online store → Emails. The reminder can be switched off there.
Lay-by #
Lay-by lets shoppers reserve items with a deposit and pay the rest once a month. They get the items once it's paid in full. Find every lay-by, what's still owed and the settings under Sales → Lay-bys.
Setting it up
- At the bottom of the Lay-bys page, tick Offer lay-by at checkout. Choose the deposit (20% to start with), the longest time to pay (1 to 6 months, one payment a month), the smallest order for lay-by (R500 to start with) and the cancellation fee (10% to start with). You can add a short note at checkout.
- Lay-by is offered for delivery in South Africa and for collection. It isn't offered for gift vouchers, quotes or PayPal.
How it works
- At checkout the shopper ticks Lay-by, chooses how many months, and sees the deposit and each monthly payment. They pay the deposit with your online payment or by EFT.
- The stock is taken straight away, so the items are kept for them. The order shows Awaiting payment with a Lay-by label and can't be shipped yet.
- Their order page shows the plan, what's paid, what's left and the next date, with a button to pay online, or your bank details for EFT.
- When the last payment comes in, the order moves to To fulfil by itself and the customer gets the usual "Payment received" email.
Payments and reminders
- For EFT, cash or card-machine payments, open the order and use Record a payment in the lay-by panel. Only record an EFT once the money shows in your account.
- Customers get a reminder email 3 days before each payment, and another when a payment is 7 days late. After 30 days the lay-by is marked 30+ days late and the phone app can alert you (tick Lay-bys 30 days late under Phone app).
- Change the wording of the lay-by emails under Online store → Emails.
Cancelling a lay-by
Press Cancel the lay-by on the order. The items go back in stock, and the panel shows the cancellation fee and the amount to refund. Pay the refund back (in the payment company's dashboard, or from your bank), then press Record refund. You can also choose store credit, which creates a voucher code for the customer.
Pre-orders and coming soon #
Show a product before it arrives. Coming soon products can't be bought yet: shoppers press Notify me, leave their email and get one email when it's for sale. Pre-order products are bought now, paid in full or with a deposit, and sent when they arrive. Find them all under Sales → Pre-orders.
Setting up a product
- Open the product and tick Show this product as coming soon or on pre-order (under Coming soon / Pre-order). Leave the product Active.
- Choose Pre-order or Coming soon, and the release date (or tick Date to be confirmed). Leave On this date, switch to normal selling and email everyone by itself ticked to let the store do it on the day.
- For a pre-order, choose Paid in full at checkout, or A deposit now, the balance when it arrives (a % of the price, or a rand amount per item). Shoppers can always choose to pay in full.
- Optional: Pre-order places (how many can be pre-ordered, for example the number on its way) and a Pre-order price (an early-bird price that ends when it arrives).
What shoppers see
- A Pre-order or Coming soon badge, the date it ships, and Pre-order now (or Notify me) instead of Add to cart.
- The cart and checkout say "Pre-order: ships from …". With a deposit, checkout offers Pay a deposit now or Pay in full now.
- Their order page shows when it ships and, for a deposit, what's paid, what's left and a button to pay the balance.
Orders and stock
- A pre-order takes its stock straight away, so a tracked item goes below zero: that's what is reserved for the pre-orders. When the last place is taken, the product shows Pre-order full. Two shoppers can never both get the last place.
- A pre-order is marked Pre-order · don't ship in the order list and can't be marked shipped until it arrives. A deposit order stays Awaiting payment until the balance is paid. Record EFT, cash or card-machine payments in the order's Pre-order panel.
- If a cart has pre-order and in-stock items, choose under Sales → Pre-orders whether everything ships together when the pre-order arrives (the standard choice), or the in-stock items go straight away.
When it arrives
Open the product under Sales → Pre-orders and press Mark as arrived (or let the release date do it). Type how many arrived to add them to the stock. The product then sells normally at its normal price. Paid pre-orders move to To fulfil with an "on its way" email, deposit customers get a "pay the balance" email (and one reminder on the day it's due), and the waiting list gets its "It's here" email.
- Each product's page under Sales → Pre-orders shows the pre-orders, the deposits collected, the balances still to be paid and the waiting list, with Export CSV.
- To cancel a pre-order, use Cancel order (unpaid, or a deposit) or Refunds (paid in full) as usual. For a cancelled deposit, pay the money back and press Record refund in the Pre-order panel.
- Change the wording of the emails (Pre-order: … and Coming soon: it has arrived) under Online store → Emails.
Bookings and appointments #
Sell time instead of stock: a treatment, a class with seats, or bikes and venues to hire. Shoppers choose a date and time on the product page and pay at the normal checkout. A cart with only bookings skips the address and delivery.
Setting up a bookable product
- Open the product under Catalogue → Products and press Set up bookings in the Bookings section.
- Tick Sell this as a booking and choose the kind: Appointment (a set length, with a break after each booking), Class or event (set dates with seats) or Rental (per day or per hour, with how many you have).
- Set the Opening hours, how much notice you need, how far ahead bookings open, your Closed dates, and whether you're Closed on public holidays. Options can have their own length, for example 60 or 90 minutes at different prices.
- Press Save. For a class, add its dates under Class dates (once, or repeated weekly).
Staff, rooms and settings
- Under Sales → Bookings → Settings, add the people or rooms that each take their own bookings, with their days off. Tick them on each bookable product; shoppers can pick someone or "Anyone available".
- Choose how long a time is held in a shopper's cart, when the reminder email goes (and by WhatsApp to shoppers who opted in), and up to how many hours before a booking customers may cancel or choose a new time online.
The bookings calendar
- Sales → Bookings shows a day per staff member or room, or a whole week. Print day sheet prints it.
- Add a booking for phone calls and walk-ins. Move and Cancel work there and on the order page; a move is only accepted when there is room, and you can email the customer.
- Export CSV downloads the bookings for a date range.
Changing an order #
Press Edit order to add or remove items, change quantities, options or prices, or change the delivery. The totals, VAT, stock, invoice and packing slip are updated, and the order's timeline shows what changed, who changed it, and the old and new totals.
You can edit unpaid orders, and paid, fulfilled and completed orders too:
- Delivery: choose from your store's delivery options for the order's address (your delivery rate or delivery areas, couriers and collection, worked out the same way as at checkout), keep it as it is, or choose Something else and type a description and cost. Press Update the options after changing the address or items. Fill in one of their addresses fills in the customer's main address or one of their other delivery addresses.
- Stock follows the items: added items are taken from stock, removed items go back. On a fulfilled or completed order, untick Put removed items back in stock if they aren't coming back.
- Email the updated order to the customer ticks itself when the items, delivery or total change. The email lists what changed, the new total, and anything still to pay or coming back. To send it later, press Send updated order on the order page: you see the email first. Change its wording under Settings → Emails ("Order updated").
When an order is already paid, the money never moves by itself:
- New total higher: the order shows Balance due. The customer sees the amount and your banking details on their order page (they can upload a proof of payment). When the money arrives, record it under Balance to pay on the order page.
- New total lower: the order shows Money to give back. Choose Back to how they paid, Store credit (a voucher code is emailed) or Another way, then press Give back. For PayFast, Yoco, Ozow, Peach Payments and EFT, send the money itself back in the payment company's dashboard or from your bank; Payflex and PayJustNow are sent the refund straight away.
Cancelling and refunding #
- Cancel order: for orders that won't go ahead. Stock goes back on sale.
- Refunds: press Refund items or an amount… to refund some items, delivery or a set amount. Your store records the refund; send the money itself back in the payment company's dashboard (PayFast, Yoco, Ozow, Peach Payments or PayPal; the refund page says where), or from your bank for EFT.
Customers are emailed when their order is cancelled or refunded.
Returns #
Customers can ask to return items from their order page, within the return window you choose (30 days to start with).
- New requests appear under Sales → Returns and on the dashboard.
- Open a request and press Approve and email instructions to send the customer your return instructions, or Decline it with a reason.
- When the items are back, refund them from the request.
Set the return window and your return instructions at the bottom of the Returns page.
Emails customers receive #
Your store emails customers automatically when they order, when an EFT payment is confirmed, when the order ships, and when it's cancelled or refunded. Every email sent for an order is listed on the order, under Emails sent, and Resend latest email sends the last one again.
To change the wording of these emails, see "Email templates" in the chapter "The look of your store".